How To Properly Install Drip Edge With Existing Gutters
by
Drip edge is a necessity when it comes to keeping your home in top condition. Installing drip edge is easy and only takes a few tools. With existing gutters, you will need to first remove any screws or nails that are holding the gutter in place. Next, you will need to loosen the gutter so that you can slide the drip edge underneath. After the drip edge is in place, you can then screw or nail the gutter back into place. Make sure to check for any gaps or holes so that water can properly drain.
Can drip edge be installed over gutters?
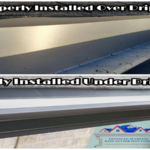
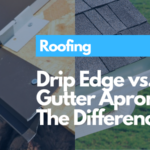
Drip edge is a metal flashing that is installed along the edges of your roof. It is used to help direct water away from your roof and into your gutters. While you can install drip edge over your gutters, it is not recommended. Drip edge is designed to be installed under your shingles and on top of your fascia board. If you install it over your gutters, it can cause your gutters to become clogged with debris.
How far should gutters be above drip edge?
There is no definitive answer to this question as it will depend on a number of factors, such as the type of roof, the climate and the amount of rainfall. However, as a general rule of thumb, gutters should be installed so that they are at least 2 inches above the drip edge. This will help to ensure that water can properly drain away from the roof and into the gutters, without causing any leaks or damage.
How do I stop rain from running behind my gutters?
Make sure your gutters are properly installed and pitched so that water flows towards the downspouts.
Inspect your gutters regularly and clean out any debris that may be blocking the flow of water.
Install gutter guards or covers to keep leaves and other debris from clogging your gutters.
How do you stop a leak between drip edge and gutter?
Inspect the area where the drip edge and gutter meet for any cracks or holes. If you find any, use a caulking gun to fill them in with sealant.
Check the gutter for any loose screws or nails. Tighten or replace them as needed.
Make sure the gutter is properly sloped so that water can flow freely through it. If it isn’t, adjust it until it is.
If the leak persists, you may need to replace the section of gutter where the leak is occurring.
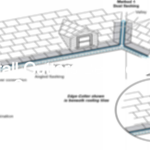
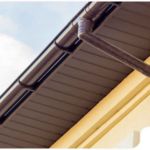
How does drip edge work with gutters?
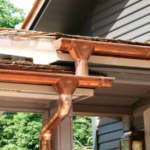
Drip edge is a metal strip that is installed along the edge of your roof. It helps to keep water from running under your shingles and causing damage to your roof.
Drip edge also helps to keep gutters from clogging. When water runs off of your roof, it can collect in your gutters and cause them to become clogged. Drip edge helps to keep the water flowing freely through your gutters so that they can do their job properly.
Without drip edge, water would be able to run freely under your shingles and into your home. This can cause serious damage to your roof and your home. Drip edge is a simple and effective way to prevent this from happening.
If you are installing gutters on your home, be sure to install drip edge as well. It is a simple and inexpensive way to protect your home from water damage.
Can drip edge be installed later?
Drip edge can be installed later, but it is not recommended. Drip edge is used to help direct water away from the fascia board and prevent water damage. If drip edge is installed later, it may not line up correctly with the fascia board and could cause water damage.
Conclusion
If you’re looking to install drip edge on your existing gutters, there are a few things you need to keep in mind. First, make sure that the drip edge is the same length as the gutters. Second, use sealant or caulk to attach the drip edge to the gutters. And finally, make sure that the drip edge is installed so that it slopes away from the house. By following these simple tips, you can ensure that your drip edge is properly installed and will help keep your gutters in good condition.
Begin by removing any existing gutter guards or fasteners.Next, use a putty knife to apply a generous amount of roofing cement to the back edge of the drip edge.Center the drip edge over the gutter opening and press it firmly…
Can drip edge be installed later? Yes, drip edge can be installed later, but it is not recommended. Drip edge should be installed when the roof is being installed to ensure that it is properly installed and does not cause…
There is no right or wrong answer to this question, as both options have their pros and cons. Installing gutters before the drip edge gives you more control over the runoff and prevents leaves and debris from clogging the system.…
In most cases, your builder will install gutters behind the drip edge, but it’s not unheard of to see them in front. There are a few reasons for this. First, it’s easier to install the gutters before the drip edge…
Begin by measuring the length of your gutter run. You will need one piece of drip edge for each gutter section.Cut the drip edge to size using a hacksaw or power saw.Install the drip edge onto the gutter run, starting…
Begin by measuring the length of your home’s eaves. This will determine how much gutter material you’ll need to purchase.Next, install the gutter hangers along the length of the eaves. Be sure to space them evenly.Once the hangers are in…
Drip edge molding is a type of molding that is installed on the edge of a roof. It is used to help protect the edge of the roof from water damage. The molding is installed under the gutters and over…
The first step is to purchase your materials. You will need to get drip edge, gutters, hangers, end caps, and downspouts. Once you have all of your materials, you will need to measure the length of your roof. You will…
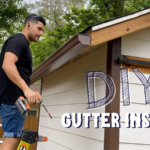
Installing a drip edge is a relatively simple process and can be done by most do-it-yourselfers. However, if you are not comfortable working on your roof, you can always hire a professional roofing contractor to install the drip edge for…
To install drip edge, first measure and cut the drip edge to the desired length.Next, nail the drip edge to the fascia board, making sure that the nails are driven into the furring strip.Once the drip edge is in place,…
The drip edge is the metal strip that runs along the edge of your roof. It's purpose is to prevent water from running back under the shingles and causing leaks.The gutters are installed under the drip edge to direct the…
Begin by measuring the length of your gutters.Cut the drip edge to size using a hacksaw or tin snips.Install the drip edge by nailing it into the front lip of the gutter.Make sure the drip edge is installed flush with…
Do gutters go under or over drip edge? Most people believe that gutters go under the drip edge, but they actually go over. The drip edge is installed first, and then the gutter is installed on top of it. The…
Begin by removing any old drip edge that may be in place. Use a pry bar or utility knife to carefully remove any nails or staples that are holding it in place.Measure the width of your gutters and cut the…
You don't have to remove your gutters to install drip edge, but doing so will make the job easier. It's also a good idea to clean your gutters before installing the drip edge to ensure that they're free of debris…
Can drip edge be installed over gutters? Drip edge cannot be installed over gutters because of the way that they are designed. Gutters are designed to channel water away from the home and into a drainage system. Drip edge is…