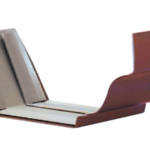
Begin by measuring the length of your RV’s rain gutters. You will need to purchase rain gutter spouts that are slightly longer than your gutters so that they can be installed flush with the edge of the gutter.
Cut the rain gutter spouts to size using a hacksaw or similar tool.
Install the rain gutter spouts by first attaching the hangers to the gutters. then, slide the spouts onto the hangers and secure them in place with the provided screws.
Finally, use silicone caulk or similar sealant to seal the seams between the rain gutter spouts and the RV’s body. This will help to prevent leaks.
How do you attach a gutter spout?
In order to attach a gutter spout, you will need the following materials: a hacksaw, a drill, a 1/4-inch drill bit, a 3/8-inch drill bit, a 1/2-inch drill bit, a level, a tape measure, a hammer, a screwdriver, a pair of pliers, and a wrench. You will also need the following items: two 10-inch long, 3/8-inch diameter galvanized carriage bolts, two 3/8-inch diameter galvanized washers, two 3/8-inch diameter galvanized nuts, two 2-1/2-inch long, 3/8-inch diameter galvanized screws, four 1/4-inch diameter galvanized screws, and one gutter spout.
Begin by cutting the gutter spout to the desired length using a hacksaw.
Next, mark the center of the gutter spout on both ends.
Then, drill a 1/4-inch hole at each of the marks.
Next, take one of the carriage bolts and insert it into the hole at one end of the gutter spout.
Add a washer and a nut to the bolt and tighten it down.
Repeat this step for the other carriage bolt at the other end of the gutter spout.
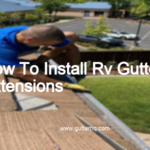
How do you install Camco gutter extensions?
The Camco gutter extensions are installed by first removing the downspouts from the gutters. Next, the brackets that come with the Camco gutter extensions are attached to the gutters. Once the brackets are in place, the Camco gutter extensions can be attached to the brackets and the downspouts can be reattached.
How do you install aluminum slip joint gutter connector?
Cut the aluminum gutter to the desired length with a hacksaw. File down any sharp edges with a metal file.
Clean the inside of the gutter with a wire brush to remove any dirt or debris.
Install the slip joint connector by inserting it into the gutter and hammering it in place with a rubber mallet.
How do you install a gutter outlet?
Installing a gutter outlet is a relatively easy process that can be completed in a few steps. First, remove any debris from the area where the outlet will be installed. Next, use a drill to make a hole in the gutter at the desired location. Once the hole is made, insert the gutter outlet into the hole and secure it in place with screws. Finally, use a sealant to seal around the outlet to prevent leaks.
What do you put under gutter spout?
There are a few things you can put under your gutter spout to prevent water from coming out and making a mess. One option is to put a piece of plastic or metal under the spout. This will catch the water and allow it to drain away without making a mess. Another option is to put a small piece of cloth under the spout. This will absorb the water and keep it from coming out.
How do you secure a drain spout?
In order to secure a drain spout, you will need to use a wrench to tighten the nut that is located underneath the spout.
You may also need to use a pliers to secure the nut, depending on the size and type of drain spout.
Once the nut is tightened, you will need to check that the spout is secure by turning on the water and making sure that there are no leaks.
If there are any leaks, you can try tightening the nut further or you may need to replace the washer.
Final Talk
If you are looking for an easy way to keep your RV clean and free of water damage, then installing RV rain gutter spouts is a great option. These spouts can be installed quickly and easily, and they will help to keep water from pooling on your RV’s roof.
There are a few different ways that you can install RV rain gutter spouts, but the most common method is to use screws or nails to secure them to the gutters. You will want to start by measuring the length…
The first step is to clean the area where the gutter drain spout will be installed. This ensures that there is no debris or other objects that could potentially interfere with the installation process.Next, measure the area where the gutter…
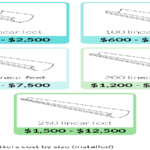
How much should labor cost to install gutters? How much does it cost to install gutters per foot? Having seamless aluminum gutters professionally installed on your home will cost around $7 to $33 per linear foot. The average per-foot cost…
If you are looking to install a rain gutter, there are a few things you will need to take into consideration. First, you will need to determine the size of the gutter you will need. The size of the gutter…
Can I install gutters myself? Gutters are most often installed by professionals, but there's no reason you can't do it yourself. All the materials and accessories are readily available at home centers, lumberyards, and roofing-supply firms. What is the proper…
Can I install gutters myself? Gutters are most often installed by professionals, but there's no reason you can't do it yourself. All the materials and accessories are readily available at home centers, lumberyards, and roofing-supply firms. How are rain gutters…
The cost of installing rain gutters can vary depending on the size and type of gutter you choose, as well as the complexity of the installation. Generally, you can expect to pay between $200 and $1,000 for the materials and…
Before installing your gutter extensions, be sure to clean out your gutters and downspouts to remove any debris that could clog up your system.To install, simply line up the extension with the gutter and screw it into place. Be sure…
Find the right rain gutters for your RV. There are a variety of rain gutters available on the market, so find the style and size that will work best for your RV.Once you have your rain gutters, it's time to…
Begin by measuring the length of the gutter you wish to install the nails into.Cut your nails to size, making sure that they are slightly longer than the gutters themselves.Next, use a hammer to gently tap the nails into the…
Begin by measuring the length of your gutter run. You will need one rain gutter cover for each section of gutter.Cut the rain gutter covers to size, using a hacksaw.Install the rain gutter covers by slipping them over the front…
Purchase the correct size and style of gutter for your home. There are a variety of rain gutters available on the market, so it's important to choose the right size and style for your home. If you're unsure of what…
Begin by measuring the length of the section of gutter you will be installing. Cut your gutter to size using a hacksaw or power saw.Next, using a drill, create pilot holes along the gutter at regular intervals. These holes will…
Decide where you want your gutters to be installed. Measure the length of the area you want to cover and mark the location of the gutters with chalk.Cut the gutters to size using a hacksaw.Install the gutters by screwing them…
Begin by measuring the length of your gutter and cutting it to size.Next, mark the placement of the brackets on the gutter.Finally, drill holes and attach the brackets using screws or nails. How do you install gutter support brackets? When…
Begin by measuring the width of the section of gutter you will be attaching the bracket to. Add 2 inches to this measurement to account for the overhang on either side of the gutter.Cut a piece of wood or PVC…