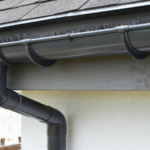
To install a rain gutter support bracket, begin by finding the horizontal fascia board that runs along the edge of your roof. This is the board to which the gutter will be attached.
Using a tape measure, mark out where you will be attaching the bracket. Make sure to leave enough space between brackets to support the length of the gutter.
Using a drill, create pilot holes at the marks you made on the fascia board.
Now, take the bracket and align the holes in the bracket with the pilot holes in the fascia board.
Use screws to attach the bracket to the fascia board. Make sure the screws are long enough to go through the bracket and into the fascia board.
Repeat this process until you have installed all the brackets you need to support your gutter.
How do you install rain gutter hangers?
Begin by measuring the length of your gutter.
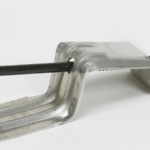
Cut hangers to size, using a hacksaw.
Install the hangers at the appropriate intervals along the gutter, using screws or nails.
Hang the gutters from the hangers, using screws or nails.
How far apart should gutter support bracket be?
The spacing of gutter support brackets depends on the type of gutter and the weight of the material that will be placed in the gutter. For most gutters, the support brackets should be placed every two feet. However, for gutters made of heavier materials, the support brackets may need to be placed closer together.
How do you reattach a gutter bracket?
It is common for gutters to become loose over time, especially if they were not installed properly to begin with. If a gutter bracket becomes loose, it is important to reattach it as soon as possible to avoid any further damage.
To reattach a gutter bracket, first remove any debris from the gutter so that you can access the bracket. Next, use a drill to screw the bracket back into place. Be sure to use screws that are long enough to go through the thickness of the gutter material and into the fascia board.
Once the bracket is secure, you can put the gutter back in place and secure it with new screws or by using a gutter sealant.
How do gutter brackets work?
Gutter brackets are the unsung heroes of a well-functioning gutter system. These small metal or plastic brackets are what keep your gutters attached to your home. Without them, your gutters would simply fall off.
Gutter brackets are typically installed every two feet along the length of the gutter. They are screwed or nailed into the fascia board, which is the board that runs along the edge of your roof. The gutter is then placed over the bracket and secured with another screw or nail.
Gutter brackets are available in a variety of materials, including aluminum, plastic, and even stainless steel. While aluminum and plastic brackets are the most common, stainless steel is becoming increasingly popular because it does not rust.
How do you install fascia brackets?
Measure the width of the space where you will be installing the fascia brackets.
Cut the fascia board to size, if necessary.
Predrill holes in the fascia board for the brackets.
Attach the brackets to the fascia board using screws.
Hang the fascia board on the brackets.
How do you fix gutter hangers?
The first step is to remove the old hanger from the gutter. This is usually done by prying it off with a screwdriver or a similar tool.
The next step is to install the new hanger. This is usually done by hammering it into place.
The last step is to secure the hanger. This is usually done by screwing it into place.
What kind of screws to use for gutter brackets?
There are several types of screws that can be used for gutter brackets, but the most common type is the hex head screw. These screws are easy to find at most hardware stores and they are very strong. Another type of screw that can be used is the Phillips head screw. These screws are also easy to find and they are also very strong.
Last Word
If you are looking to install rain gutter support brackets, then you have come to the right place. This article will provide you with a step-by-step guide on how to do just that. With a little bit of time and effort, you will be able to have your rain gutters up and running in no time.
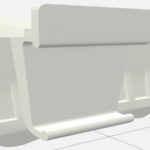
Begin by measuring the width of the section of gutter you will be attaching the bracket to. Add 2 inches to this measurement to account for the overhang on either side of the gutter.Cut a piece of wood or PVC…
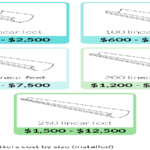
How much should labor cost to install gutters? How much does it cost to install gutters per foot? Having seamless aluminum gutters professionally installed on your home will cost around $7 to $33 per linear foot. The average per-foot cost…
If you are looking to install a rain gutter, there are a few things you will need to take into consideration. First, you will need to determine the size of the gutter you will need. The size of the gutter…
Can I install gutters myself? Gutters are most often installed by professionals, but there's no reason you can't do it yourself. All the materials and accessories are readily available at home centers, lumberyards, and roofing-supply firms. What is the proper…
How do you install gutter roof hangers? Start by finding the location of the nearest gutter outlet. This is where the water will exit the gutter and drain away from the house.Measure the distance from the gutter outlet to the…
Can I install gutters myself? Gutters are most often installed by professionals, but there's no reason you can't do it yourself. All the materials and accessories are readily available at home centers, lumberyards, and roofing-supply firms. How are rain gutters…
The cost of installing rain gutters can vary depending on the size and type of gutter you choose, as well as the complexity of the installation. Generally, you can expect to pay between $200 and $1,000 for the materials and…
Begin by measuring the length of the gutter you wish to install the nails into.Cut your nails to size, making sure that they are slightly longer than the gutters themselves.Next, use a hammer to gently tap the nails into the…
Begin by measuring the length of your gutter run. You will need one rain gutter cover for each section of gutter.Cut the rain gutter covers to size, using a hacksaw.Install the rain gutter covers by slipping them over the front…
Purchase the correct size and style of gutter for your home. There are a variety of rain gutters available on the market, so it's important to choose the right size and style for your home. If you're unsure of what…
Begin by measuring the length of the section of gutter you will be installing. Cut your gutter to size using a hacksaw or power saw.Next, using a drill, create pilot holes along the gutter at regular intervals. These holes will…
Begin by measuring the length of your gutter and cutting it to size.Next, mark the placement of the brackets on the gutter.Finally, drill holes and attach the brackets using screws or nails. How do you install gutter support brackets? When…
Locate the rain trap. It is typically found near the downspout of the gutter.Unscrew the rain trap from the gutter.Clean out the gutter of any debris.Screw the rain trap back into the gutter. How do you attach a rain barrel…
Start by finding the rain chain gutter installer that fits your needs.Once you have found the right rain chain gutter installer, read the instructions carefully.Follow the instructions step by step to ensure a proper installation.Check the rain chain gutter installer…
Start by finding the location of your downspout. Typically, this will be near the edge of your roof where the gutter meets the house.Once you have found the location of the downspout, measure the distance from the edge of the…
To install rain gutter nails, start by removing any old nails or other debris from the gutters. Next, use a ladder to climb up to the roof and position the rain gutter so that it is level. Then, holding the…