Begin by measuring the length of your gutter and cutting it to size.
Next, mark the placement of the brackets on the gutter.
Finally, drill holes and attach the brackets using screws or nails.
How do you install gutter support brackets?
When installing gutters, you will need to use support brackets to keep them in place. These brackets are usually made of metal or plastic and can be found at most hardware stores. To install them, simply screw the brackets into the fascia board using screws that are long enough to go through the board and into the gutter. Start by attaching the bracket at the end of the gutter and then work your way up. Make sure that the brackets are spaced evenly so that the gutters can drain properly.
Where should gutter hangers be placed?
There is no definitive answer to this question as it depends on the specific installation and the home’s roof design. However, as a general rule of thumb, gutter hangers should be placed every two feet along the gutter.
How do you install gutter hidden hangers?
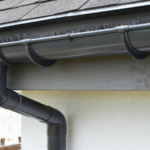
Installing gutters is a messy and time-consuming job, but it’s a necessary one if you want to keep your home in good condition. Gutters channel water away from your home, preventing it from seeping into your foundation and causing damage. Hidden hangers are a type of gutter hanger that are not visible from the ground, making them a more aesthetically pleasing option.
To install gutters with hidden hangers, you will need to purchase the hangers themselves, as well as brackets and screws. The hangers should be attached to the front of the gutter, with the brackets attaching the hangers to the fascia board. Once the hangers are in place, you can then attach the gutter to the hangers using screws.
It’s important to make sure that the gutters are properly installed so that they can do their job properly. If you’re not confident in your ability to install gutters, it’s best to hire a professional.
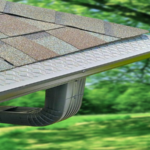
How do you install gutter roof hangers?
Begin by measuring the length of your gutter and marking the center point on the underside of the gutter.
At the center point, mark a point 3 inches in from each side of the gutter.
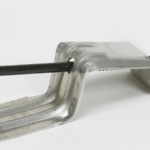
Drill pilot holes at the marks, and then use screws to attach the hangers to the gutter.
What kind of screws do you use for gutter brackets?
There are many different types of screws that can be used for gutter brackets, but the most common type is the hex head screw. These screws are made with a hexagonal head that is designed to be driven with a wrench or socket. The hex head screw is also made with a very sharp point that helps it to bite into the material it is being driven into.
Do you nail or screw gutters?
There are a few schools of thought when it comes to nailing or screwing gutters. The first is that it doesn’t really matter which method you use, as long as the gutters are securely attached. The second is that nailing is the preferred method because it’s more secure and less likely to come loose over time. The third is that screwing is the way to go because it’s faster and easier.
Personally, I think it comes down to personal preference. If you’re comfortable with nailing, then go for it. If you’re more comfortable with screwing, then go for that. Either way, as long as the gutters are securely attached, you’ll be fine.
What distance should gutter brackets be?
There is no definitive answer to this question as it depends on the specific circumstances of your home. However, as a general rule of thumb, gutter brackets should be spaced between 24 and 36 inches apart. This will ensure that your gutters are able to effectively collect and channel water away from your home.
Conclusion
If you want to install rain gutter brackets, there are a few things you need to know. First, you need to measure the length of the gutter you want to install the brackets on. Next, you need to mark the location of the brackets on the gutter. Finally, you need to drill holes for the brackets and then attach the brackets to the gutter.
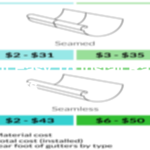
How much should labor cost to install gutters? How much does it cost to install gutters per foot? Having seamless aluminum gutters professionally installed on your home will cost around $7 to $33 per linear foot. The average per-foot cost…
If you are looking to install a rain gutter, there are a few things you will need to take into consideration. First, you will need to determine the size of the gutter you will need. The size of the gutter…
How do you install rain gutter hangers? 1: START 6 INCHES. Install the first hanger 6 inches from the end of the gutter or miter.2: SPACE 2 FEET. Hook the hangers into the lip of the gutter no more than…
Can I install gutters myself? Gutters are most often installed by professionals, but there's no reason you can't do it yourself. All the materials and accessories are readily available at home centers, lumberyards, and roofing-supply firms. What is the proper…
For a more professional look, you may want to hire a contractor to install your gutters. This will add to the overall cost, but it will also ensure that the job is done correctly and that your gutters have a…
Can I install gutters myself? Gutters are most often installed by professionals, but there's no reason you can't do it yourself. All the materials and accessories are readily available at home centers, lumberyards, and roofing-supply firms. How are rain gutters…
Begin by measuring the area where the gutter brackets will be installed. It is important to ensure that the brackets are spaced evenly along the gutter.Once the measurements have been made, mark the placement of the brackets on the gutter.Using…
The cost of installing rain gutters can vary depending on the size and type of gutter you choose, as well as the complexity of the installation. Generally, you can expect to pay between $200 and $1,000 for the materials and…
Yes, Lowe’s offers rain gutter installation services. You can purchase your rain gutters and have them installed by Lowe’s professionals. Lowe’s can also install gutter guards to help keep your gutters clean and free of debris. Does Lowes install gutters?…
Is it cheaper to install gutters yourself? No, it is not cheaper to install gutters yourself. Although the initial investment might be cheaper, the cost of labor and materials will quickly add up. Plus, if you don't know what you're…
Purchase the correct size and style of gutter for your home. There are a variety of rain gutters available on the market, so it's important to choose the right size and style for your home. If you're unsure of what…
There are a few different ways that you can go about installing rain gutters. You can either do it yourself, or you can hire a professional contractor to do it for you. If you decide to do it yourself, you…
Begin by measuring the length of the gutter you wish to install the nails into.Cut your nails to size, making sure that they are slightly longer than the gutters themselves.Next, use a hammer to gently tap the nails into the…
Begin by measuring the length of your gutter.Cut your gutter to length, using a hacksaw or power saw.Install your gutter brackets at the desired intervals along the length of your gutter. Make sure to use brackets that are rated for…
Begin by measuring the length of your gutter run. You will need one rain gutter cover for each section of gutter.Cut the rain gutter covers to size, using a hacksaw.Install the rain gutter covers by slipping them over the front…
You will need a ladder, a tape measure, a level, a hammer, nails, and gutter brackets.Measure the length of your gutter and mark where you will need to place the brackets.Place the ladder at the mark and use the level…