If your home is in a cold climate and you have to worry about ice dams, then you might want to consider installing heated coil gutter cables. These cables can help prevent ice dams from forming and causing damage to your gutters and roof. Here are a few tips on how to install them.
- First, you’ll need to purchase the cables and a gutter installation kit.
- Next, you’ll need to remove the old gutters and downspouts.
- Once the old gutters are removed, you’ll need to measure and mark where you want the new gutters to go.
- Now, you can install the new gutters according to the kit instructions.
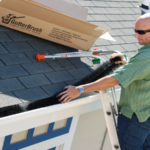
- After the new gutters are in place, you can then install the heated coil gutter cables.
- Start at the bottom of the gutter and work your way up, securing the cables with the included clamps.
- Once all of the cables are in place, you can then reconnect the downspouts.
- That’s it! You’ve successfully installed heated coil gutter cables.
How do you install heating cables for gutters?
Heating cables can be installed on the inside or outside of gutters to help prevent ice dams from forming. When installed on the inside of gutters, the cables are less visible and are less likely to be damaged by debris.
How do you install ice melting roof cables?
There are a few things you need in order to install ice melting roof cables. First, you need to make sure you have the correct type of cable for your roof. There are different types of cables for different types of roofs, so make sure you get the right kind. Second, you need to have a way to attach the cables to your roof. This can be done with special clips or by drilling holes into your roof. Third, you need to connect the cables to an electrical outlet. Once the cables are installed, they will automatically turn on and off as needed to keep your roof clear of ice.
How do you install electric heat cables?
Installation of an electric heat cable is not difficult, but there are a few things to keep in mind. First, make sure that the area where the cable will be installed is clean and free of debris. Next, measure the area to be heated, and cut the cable to the appropriate length. Once the cable is cut, strip away a portion of the insulation at each end of the cable, and connect the exposed wires to the power source. Finally, apply the self-adhesive tape to the back of the cable, and adhere it to the desired surface.
How hot does gutter heat cable get?
Gutter heat cable is a type of electrical heating element that is often used to prevent ice formation on gutters, roofs, and other exposed surfaces. The cable is typically made of copper or aluminum and is insulated with a durable material such as polyethylene. The heating element is controlled by a thermostat, and the temperature can be adjusted depending on the desired application. In most cases, gutter heat cable is used to prevent ice formation and to keep gutters and roofs clear of snow and debris.
Gutter heat cable typically operates at a temperature between 120 and 150 degrees Fahrenheit. The exact temperature depends on the specific application and the type of cable used. For example, aluminum cable is often used for roof and gutter applications because it has a higher heat conductivity than copper. This means that aluminum cable can operate at a higher temperature than copper, which is important for preventing ice formation.
Gutter heat cable is an effective way to prevent ice formation and to keep gutters and roofs clear of snow and debris. The cable is typically made of copper or aluminum and is controlled by a thermostat. The temperature can be adjusted depending on the desired application, but in most cases, the cable operates at a temperature between 120 and 150 degrees Fahrenheit.
How long should roof heating cables be left on?
- Depending on the severity of the winter weather, it is generally recommended that roof heating cables be left on for at least 48 hours at a time. This will ensure that your roof is properly heated and protected from the elements.
- If you are expecting a particularly cold snap or a major snowstorm, you may want to leave your roof heating cables on for an extended period of time. This will help to prevent any damage to your roof that could be caused by the extreme weather conditions.
- It is important to note that roof heating cables should never be left on unattended. If you are going to be away from home for an extended period of time, make sure to turn off the power to the cables before you leave. This will prevent any accidents or fires from occurring.
How much does it cost to install roof heating cables?
The cost of installing roof heating cables will vary depending on the size and type of roof, the climate, and the number of people in the household. The average cost for a single-family home in the United States is $3,000 to $4,000.
Are heated gutters worth it?
Heated gutters are designed to prevent ice and snow from building up on your roof and in your gutters, which can help to reduce the risk of roof damage and leaks. While they may cost more upfront, heated gutters can save you money in the long run by preventing expensive repairs.
Conclusion
If you’re looking for a way to keep your gutters clear of ice and snow this winter, look no further than heated coil gutters cables. These cables are easy to install and will keep your gutters flowing freely all winter long.