- Begin by measuring the length of your gutter.
- Cut two pieces of gutter end cap material to size, using a hacksaw.
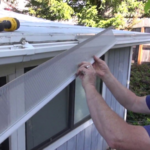
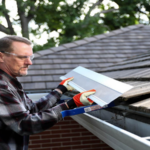
- Place one end cap on the end of the gutter, and secure it in place with a few small nails.
- Continue securing the end cap in place by driving a few nails through the side of the gutter and into the end cap.
- Repeat this process for the other end cap.
- You may need to trim the end caps slightly to get a snug fit.
- That’s it! Your gutters are now ready to use, without the need for any tools.
How do you attach end caps to gutters?
Most end caps are attached with either screws or nails. Many times the end cap will come with the proper fasteners. If not, you can use any type of screw or nail that is long enough to penetrate through the end cap and into the gutter. It is important to make sure that the end cap is attached securely so that it does not come off during a rainstorm.
Can you rivet gutter end caps?
Yes, in most cases you can rivet gutter end caps. However, it is important to check the type of gutter end caps you have to ensure that they are compatible with the type of gutter system you have. Additionally, it is always best to consult with a professional to get the best results.
Do gutters need end caps?
Gutters don’t technically need end caps, but they are a good idea for a few reasons. First, end caps help to keep debris from clogging up the gutters. Second, they give the gutters a finished look and can help to prevent water from leaking out of the gutters.
How do you rivet gutter ends?
Gutter ends can be riveted using a few different methods. The most common is to use a rivet gun and rivets. Another method is to use a hammer and nails.
If you’re using a rivet gun, start by drilling a pilot hole through the gutter end. Next, insert a rivet into the pilot hole and squeeze the trigger of the rivet gun to set the rivet. Repeat this process for each rivet you’re using.
If you’re using a hammer and nails, start by hammering a nail into the gutter end. Next, bend the nail over so that the end is flush with the gutter. Repeat this process for each nail you’re using.
How do you attach end caps?
If you need to attach end caps, the first step is to find the right size. Once you have the right size, you will need to find the center of the end cap. To do this, you will need to measure the width and height of the end cap. Once you have the center, you will need to find the center of the beam. To do this, you will need to measure the width and height of the beam. Once you have the center, you will need to align the two centers. Once you have aligned the two centers, you will need to clamp the end cap to the beam. Once you have clamped the end cap to the beam, you will need to drill a hole through the end cap and the beam. Once you have drilled a hole through the end cap and the beam, you will need to bolt the end cap to the beam.
How do you install an endcap?
Installing an endcap is a relatively easy process. First, you will need to gather the necessary materials. These include the endcap, a screwdriver, a drill, and screws. Once you have all of these items, you will need to mark the location of the endcap on the wall. Next, you will need to drill pilot holes into the wall. Once the pilot holes are drilled, you can now screw in the endcap.
How do I stop my gutter end cap from leaking?
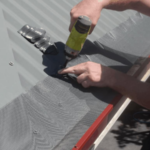
If your gutter end cap is leaking, there are a few things you can do to try to fix the issue. First, check to see if the end cap is properly seated and screwed in. If it is not, try reseating and screwing it in. If that does not work, you may need to replace the end cap. Another option is to apply silicone caulk around the end cap to help seal any gaps and prevent leaking.
Last Word
If you’re looking for an easy way to install gutter end caps without using any tools, then this is the method for you! Just follow these simple steps and you’ll be done in no time.