Begin by measuring the area where the gutter brackets will be installed. It is important to ensure that the brackets are spaced evenly along the gutter.
Once the measurements have been made, mark the placement of the brackets on the gutter.
Using a drill, create pilot holes for the screws that will secure the brackets to the gutter.
Install the gutter brackets, securing them with the screws.
Finally, check to make sure that the brackets are level and secure. If necessary, make adjustments as needed.
Where should gutter hangers be placed?
There is no definitive answer to this question as it depends on the specific roof and gutter system involved. However, as a general rule of thumb, gutter hangers should be placed at least every two feet (61 cm) apart, and more frequently if the roof is particularly steep or the gutters are particularly long.
How far apart to put gutter brackets?
There is no definitive answer to this question as it will depend on the specific installation and the materials being used. However, as a general guide, it is recommended that gutter brackets should be spaced at intervals of no more than 1 metre (3 feet) apart. It is also worth noting that the further apart the brackets are spaced, the more support they will need to provide, so it is important to ensure that they are securely fixed in place.
What screws to use for gutter brackets?
There are a few different types of screws you can use for gutter brackets, but the most common are hex head screws. These screws are easy to find at most hardware stores and come in a variety of sizes to fit different types of gutters. You’ll also need to decide on the length of the screw, which will be determined by the thickness of the gutter bracket and the type of material the screw will be going into.
Do you nail or screw gutters?
Most people would say that you should screw gutters, because it provides a more secure hold and prevents gutters from coming loose. However, some experts argue that nailing is the better option because it allows the gutters to expand and contract with the temperature, which prevents them from cracking.
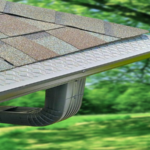
Do gutter hangers go under drip edge?
The answer is no, gutter hangers do not go under the drip edge. The drip edge is a piece of metal that is installed at the edge of the roof to help keep water from running behind the gutters. The gutter hangers are installed on the inside of the gutters and help to hold the gutters in place.
What should you not do when installing gutters?
Don’t use the wrong type of fastener. Nails and screws are not created equal. Make sure you’re using the right type of screw or nail for the job.
Don’t over-tighten the fasteners. This can strip the threads or damage the gutter material.
Don’t use too much sealant. A little goes a long way. Too much sealant can make a mess and be difficult to clean up.
Don’t forget to caulk the seams. This will help prevent leaks.
Don’t forget to install the downspouts. These are an important part of the gutter system and help direct water away from your home.
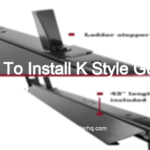
How do you install gutter roof hangers?
Installing gutter roof hangers is a fairly simple process, but there are a few things you need to keep in mind.
First, you’ll need to make sure that the hangers you select are the right size for your gutters.
Next, you’ll need to determine the spacing for the hangers.
Once you have the hangers and the spacing figured out, you can begin installing them.
Finally, once the hangers are in place, you can finish the installation by attaching the gutters to the hangers.
Last Word
If you want to install gutter brackets, you need to follow these steps. First, measure the distance between the fascia board and the gutter. Then, mark the location of the brackets on the fascia board. Next, drill pilot holes for the brackets. Finally, use screws to secure the brackets to the fascia board.
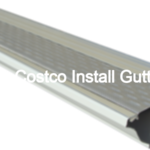
How much should labor cost to install gutters? How much does it cost to install gutters per foot? Having seamless aluminum gutters professionally installed on your home will cost around $7 to $33 per linear foot. The average per-foot cost…
How do you install rain gutter hangers? 1: START 6 INCHES. Install the first hanger 6 inches from the end of the gutter or miter.2: SPACE 2 FEET. Hook the hangers into the lip of the gutter no more than…
How far apart do you install gutter hangers? Hanger Spacing If you live in a warm area with less rain, then you should install your gutter hangers near the middle of the gutter every 24 inches or where there is…
Begin by measuring the length of your gutter.Cut your gutter to length, using a hacksaw or power saw.Install your gutter brackets at the desired intervals along the length of your gutter. Make sure to use brackets that are rated for…
Begin by measuring the length of your gutter and cutting it to size.Next, mark the placement of the brackets on the gutter.Finally, drill holes and attach the brackets using screws or nails. How do you install gutter support brackets? When…
You will need a ladder, a tape measure, a level, a hammer, nails, and gutter brackets.Measure the length of your gutter and mark where you will need to place the brackets.Place the ladder at the mark and use the level…
Before you start, make sure you have all the necessary tools and materials. You will need a ladder, a tape measure, a level, a power drill, 3/16” drill bit, ¼” socket wrench or nut driver, hammer, and u-style gutter brackets.Measure…
Installing gutter brackets is a simple process that can be completed in a few minutes. The first step is to determine the location of the brackets. The brackets should be placed approximately four feet apart, with the first bracket being…
When installing gutter brackets, the length of screws you'll need will depend on the thickness of your gutter and the material you're screwing into. For a standard 5" aluminum gutter, #8 x 1-1/4" screws are typically used. If you're attaching…
Begin by finding the center of your gutter and making a mark.Pre-drill a hole at the mark, using a drill bit that is slightly smaller than the diameter of your screw.Screw the bracket into the hole, using a screw that…
Begin by measuring the length of your gutter and cutting it to size.Next, mark the location of the hangers on the gutter.Drill pilot holes at the marked locations.Attach the hangers to the gutter using screws.Hang the gutter on the fascia…
How much does home Depot charge for gutters? Home Depot generally charges around $200 for gutters, give or take a few dollars depending on the style and material of the gutter.Some factors that can affect pricing include the length and…
Gutters are installed by professional contractors. The process begins with a consultation to determine the best type of gutters for your home. Once the type of gutters is selected, the contractor will measure the eaves of your home and cut…
Begin by finding the center of your gutter and making a mark.Next, measure out from the center mark you made and make another mark at the desired location for your hanger.Drill a pilot hole into the mark you just made.Insert…
Begin by measuring the inside of your gutter to determine how many brackets you will need.Cut your brackets to size, if necessary.Install the first bracket at the center point of your gutter.Measure and mark the location of the remaining brackets,…
Begin by measuring the length of your gutter.Cut hangers to size, using a hacksaw.Install the hangers at the top of the gutter, using screws or nails.Hang the gutter from the hangers.Secure the gutter in place by driving screws or nails…