- Before you begin, make sure you have all the necessary tools and materials. You will need a ladder, a putty knife, a hammer, nails, and drip edge.
- Start by removing any old drip edge from around the gutters. Use the putty knife to scrape away any old caulking or sealant.
- Once the old drip edge is removed, clean the area around the gutters with a damp cloth.
- Place the new drip edge onto the gutters, making sure that the spikes are facing down.
- Use the hammer to nail the drip edge into place. Make sure that the nails are spaced evenly and that the heads are flush with the edge.
- Once all the nails are in place, use the putty knife to apply a bead of caulking around the perimeter of the drip edge. This will help to seal it in place and prevent water from leaking behind it.
- Allow the caulking to dry for 24 hours before using the gutters.
How do you install drip edge with existing gutters?
- Remove any old drip edge that is attached to the gutters.
- Cut new drip edge to fit the length of the gutters.
- Attach the new drip edge to the gutters using screws or nails.
- Make sure that the drip edge is properly sealed to the gutters to prevent leaks.
Can you install drip edge after gutters?
It is possible to install drip edge after gutters, but it is not recommended. Drip edge should be installed before the gutters are installed so that the gutters can be properly secured to the drip edge. If you install the drip edge after the gutters are installed, you run the risk of the gutters becoming detached from the drip edge and causing water damage to your home.
How far should drip edge extend into gutter?
- Drip edge should extend ⅛ to ¼ inch into the gutter.
- This will ensure that water runs off the edge of the roof and into the gutter, instead of running down the side of the house.
- It will also help to keep debris from clogging the gutter.
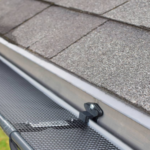
Do gutter guards go under drip edge?
If you have a gutter that is installed with a drip edge, then you will want to make sure that your gutter guards go under the drip edge. This will help to ensure that your gutters are protected from leaves and other debris that can clog them.
Should drip edge be nailed to fascia?
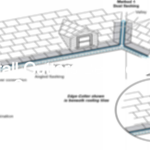
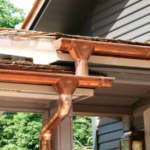
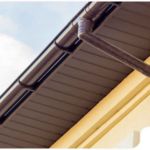
The drip edge is the metal flashing that is installed along the lower edge of a roof. The purpose of the drip edge is to direct water away from the edge of the roof and into the gutters. The drip edge also provides a finished edge to the roof and helps to prevent wind and rain from entering under the shingles. The drip edge should be nailed to the fascia, which is the board that is installed along the edge of the roof.
Does drip edge need to be nailed?
Drip edge is a metal flashing installed along the lower edge of a roof. Its purpose is to protect the roofing materials and the underlying structure of the roof from water damage. Drip edge also helps to keep water from seeping under the shingles and causing leaks.
Most drip edge is made from aluminum or galvanized steel. It is available in a variety of widths and heights to accommodate different roof designs. The most common width is two inches, but four-inch wide drip edge is also available. The height of the drip edge should be tall enough to extend past the bottom edge of the shingles by at least ½ inch.
Drip edge is installed after the roofing felt has been laid down and before the shingles are installed. The first step is to install the drip edge along the eave of the roof. The drip edge is nailed in place using roofing nails. The nails should be spaced every eight inches.
After the drip edge has been installed along the eave, it is time to install the drip edge along the gable ends of the roof. The drip edge is installed in the same manner as it was along the eave. Nails are used to secure the drip edge in place, and they should be spaced every eight inches.
Once the drip edge has been installed, the shingles can be installed. The shingles should overlap the drip edge by at least two inches.
How do you stop water leaks between drip edge and gutters?
- The first thing you need to do is identify where the water is coming from. If the leak is coming from the joint between the drip edge and the gutter, then you will need to seal that joint.
- To seal the joint, you will need to use a sealant that is compatible with both the drip edge and the gutter.
- Once you have applied the sealant, you will need to wait for it to dry.
- Once the sealant is dry, you will need to check the joint to make sure that the leak has been stopped.
- If the leak has not been stopped, you may need to reapply the sealant or try a different sealant.
Last Word
If you’re looking to add some extra protection to your gutters, installing drip edge is a great way to do it. Drip edge helps to keep water from seeping behind your gutters and causing damage. Plus, it gives your gutters a nice finished look. Here’s a quick guide on how to install drip edge around spiked gutters.
Start by measuring the length of your gutters. You’ll need to purchase enough drip edge to cover the entire length. Cut the drip edge to size using a hacksaw.
Next, use a drill to make pilot holes in the drip edge. These holes will line up with the spikes on your gutters.
Now it’s time to install the drip edge. Begin at one end of your gutters and work your way around, attaching the drip edge with the screws. Be sure to seal the joints with caulk to prevent leaks.